A while back, I was working on a project that required the use of a lambda layer that was published at the AWS Serverless Application Repository. The usual installation method is to visit the Serverless Application Repository (hereafter, serverless repo) page from the AWS console, search for the layer you’re interested in, and click the “Deploy” button to install it into your account for use in your lambda functions. This is nice and easy, but whenever possible I tend to Eschew the Console™, so I set about trying to find a way to deploy a layer using CloudFormation.
Surprisingly, an internet search wasn’t much help. I found plenty of information on how to create and use your own lambda layers, but nothing on how to use those (via CloudFormation) published in the serverless repo. I even posted a question on AWS re:Post. The couple of replies I did get (thanks!) weren’t much help except for one reference to the AWS CLI command, serverlessrepo. The actual use of the command cited was wrong, but that reference set me on the right track.
Getting the Layer’s ARN
The serverlessrepo command (I use the AWS CLI V2 command) has a number of subcommands to create, modify, list, delete. etc. applications (including lambda layers) stored in the serverless repo. Many of the commands use an --application-id flag to identify the application (or layer). It turns out that this is actually an ARN tied to the serverless repo.
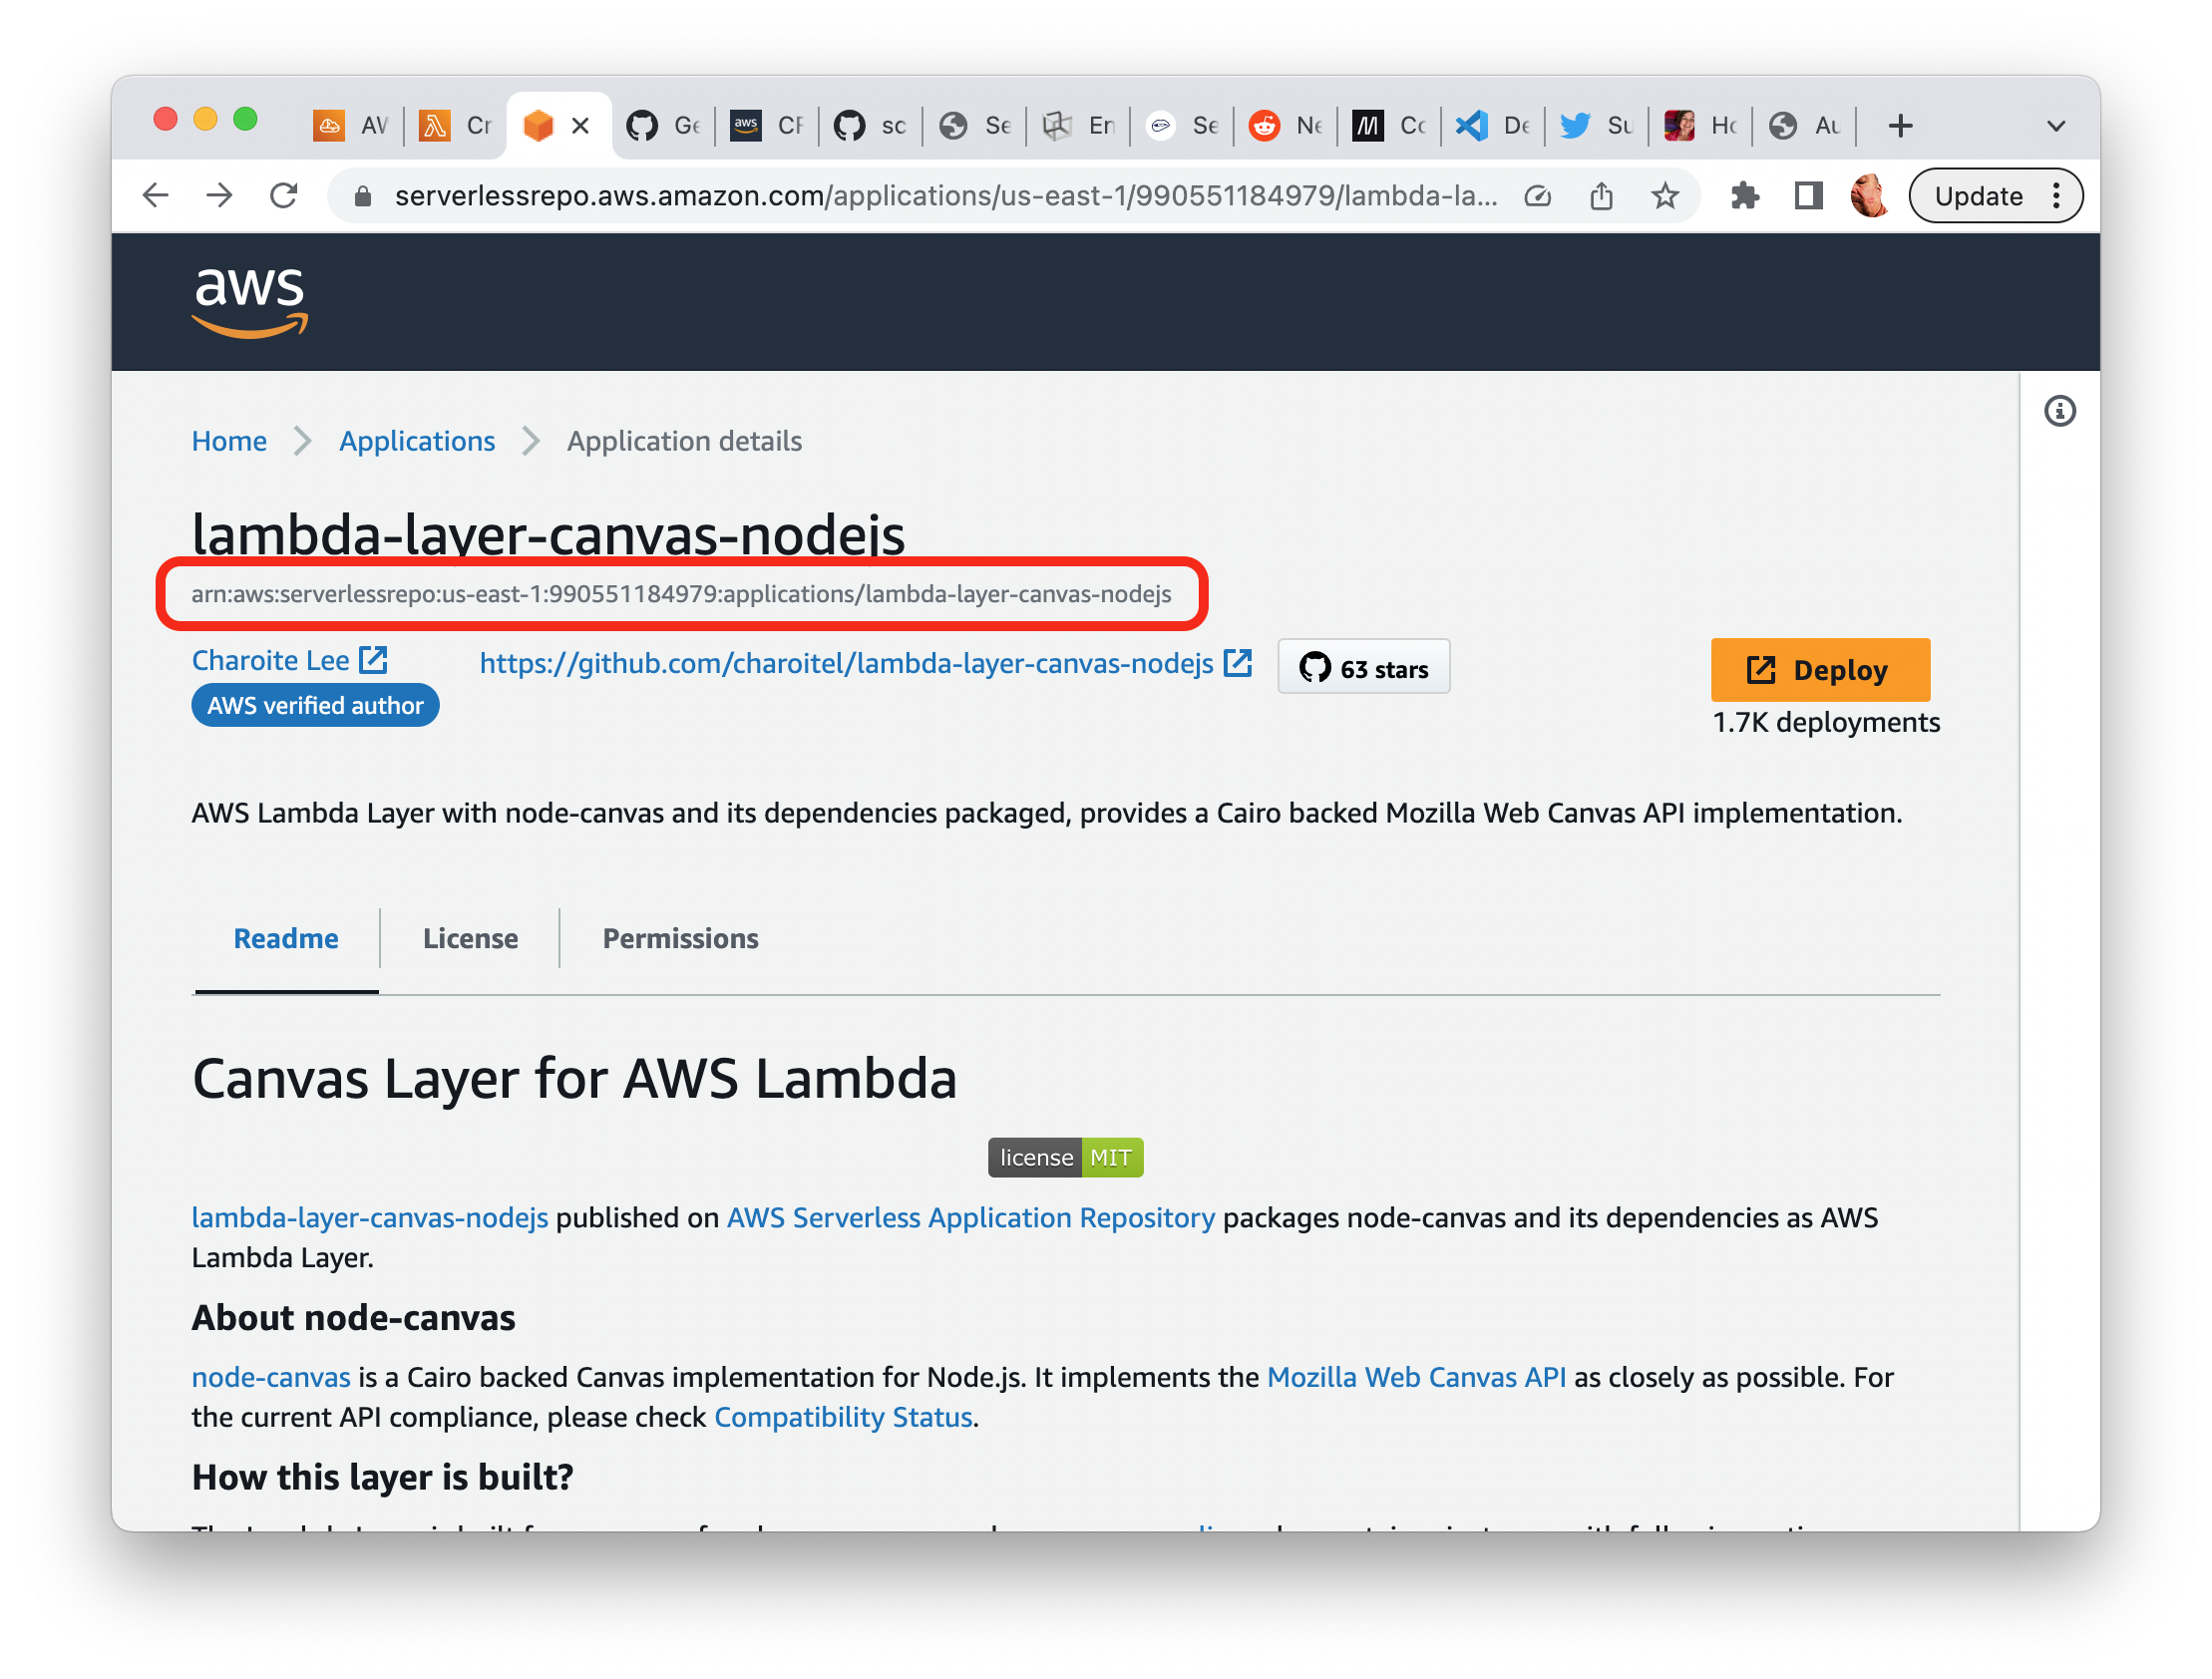
As far as I can tell, there is no way to query the serverless repo using a symbolic name even though the console or web page allows you to do so. For example, the layer that I wanted to use is called lambda-layer-canvas-nodejs and you can find it in the console with a substring search (e.g. canvas). So, unfortunately, you must use the console or web once to get the ARN of the layer. Navigate to the Applications page of the serverless repo and enter keywords to search for the layer. Once on the Application Details page, you can copy the layer’s ARN. Its location is circled in red in the image below.
You might ask: If you need to use the console to get the ARN anyway, why not just click the “Deploy” button and be done with it? And you’d be right if we were just building a simple exploratory project. I decided to chase down an automated installation process so that I could deploy the layer in a CI/CD process where the console isn’t available. Also, even thouh ARNs in AWS seem to be relatively ephemeral and change frequently, the ARN tied to the application in the serverless repo appears to be permanent. Even if new versions of the layer are released, the ARN itself won’t change.
Versions and ARNs: Part 1
This is a good time to talk about ARNs and versions, at least as they apply to this process. For this task (deploying and using the lambda layer) we’ll be using two ARN/version pairs. The source of the lambda layer is the serverless repo using the ARN we just discussed. The source layer can also have multiple versions. These version numbers adhere to the semantic versioning standard (e.g. 2.1.0). The destination of the layer is your account, where it will be deployed to (the source layer must be deployed into your account for use in your lambda functions—you can’t use it directly from the serverless repo). It gets its own ARN in your account. Also, every time you install it in your account, it gets another version number (but still the same ARN). These version numbers are integers, starting at 1 and incrementing with each deploy. You can have multiple destination versions of the layer installed in your account at the same time. An important point is that these destination version numbers are not necessarily correlated with the source software versions from the serverless repo. We’ll have more to say about this later on.
Deploying the Layer to Your Account
First, make sure you have your credentials set up to access your account via the CLI (using either an IAM user or IAM Identity Center SSO). Since we’ll be creating an IAM role later, Admin-like permissions are typically required.
Deploy the Latest Version of the Layer
Using the source ARN, we can now deploy the layer to our account. As I said earlier, I want to use CloudFormation to do this (it’s the way I build my entire project). Luckily, the serverlessrepo command can help us here. The create-cloud-formation-template subcommand lets us download a CloudFormation template that we can run (via aws cloudformation deploy) to install the layer into our account. The subcommand gives us a URL (it appears to be an AWS pre-signed URL) that we can use to download the template. The following bash shell command uses curl to grab the template and store it in a temporaty file. If you’re not familiar with the --query syntax, it’s just a way to extract specific information of interest (in this case the pre-signed URL) from the often voluminous responses returned from AWS CLI commands.
aws serverlessrepo create-cloud-formation-template     \
    --application-id SOURCE_ARN_FROM_SERVERLESS_REPO   \
    --query='TemplateURL'                              \
    | xargs curl > TEMPORARY_CFN_FILE.yml
Next, using the temporary CloudFormation YAML file, we can deploy the source layer to our account. Choose your own stack name instead of the DEPLOY_LAYER_STACK_NAME placeholder. I like to use the deploy subcommand because it’s synchronous.
aws cloudformation deploy                              \
    --stack-name DEPLOY_LAYER_STACK_NAME               \
    --template-file TEMPORARY_CFN_FILE.yml
Deploy a Specific Version of the Layer
When deployed as above, the latest (or most recent) version of the source layer is installed. Recall that the source layer can have multiple semantic versions. You can use the CLI to see all the semantic versions of a source layer as follows:
aws serverlessrepo list-application-versions           \
    --application-id SOURCE_ARN_FROM_SERVERLESS_REPO
This produces an output like:
{
    "Versions": [
        {
            "ApplicationId": "arn:aws:serverlessrepo:us-east-1:990551184979:applications/lambda-layer-canvas-nodejs",
            "CreationTime": "2022-09-11T09:48:26.343Z",
            "SemanticVersion": "2.10.1",
            "SourceCodeUrl": "https://github.com/charoitel/lambda-layer-canvas-nodejs"
        },
        {
            "ApplicationId": "arn:aws:serverlessrepo:us-east-1:990551184979:applications/lambda-layer-canvas-nodejs",
            "CreationTime": "2023-01-09T05:34:10.482Z",
            "SemanticVersion": "2.11.0",
            "SourceCodeUrl": "https://github.com/charoitel/lambda-layer-canvas-nodejs"
        },
        {
            "ApplicationId": "arn:aws:serverlessrepo:us-east-1:990551184979:applications/lambda-layer-canvas-nodejs",
            "CreationTime": "2023-01-25T13:09:46.601Z",
            "SemanticVersion": "2.11.1",
            "SourceCodeUrl": "https://github.com/charoitel/lambda-layer-canvas-nodejs"
        },
...
Should you wish to install a version of the layer other than latest, you can supply the semantic-version flag to the create-cloud-formation-template command:
aws serverlessrepo create-cloud-formation-template     \
    --application-id SOURCE_ARN_FROM_SERVERLESS_REPO   \
    --semantic-version "2.10.1"                        \
    --query='TemplateURL'                              \
    | xargs curl > TEMPORARY_CFN_FILE.yml
Other than this change, all other steps described above remain the same.
Verify the Deployment and Get the Destination ARN
A variety of AWS CLI commands can be used to explore the stack and layer that was just deployed:
aws cloudformation list-stacks
aws cloudformation describe-stacks --stack-name DEPLOY_LAYER_STACK_NAME
aws lambda list-layers
In particular, examine the stack’s output for the ARN of the layer that was just installed in your account:
aws cloudformation describe-stacks                     \
    --stack-name DEPLOY_LAYER_STACK_NAME
The ARN of the newly deployed layer is available as the value of the key: LayerVersion as shown below (where XXXXXXXXXXXX will be your account number).
|
|
Use the Layer with CloudFormation
At this point, the layer has been installed in your account and you’ve captured its ARN. This ARN can now be used by CloudFormation to augment a lambda function. In the companion GitHub repository for this post I’ve created a sample CloudFormation template that uses a lambda layer. The relavant resource for the lambda function that I use to test for correct installation is shown below.
|
|
Lines 12–24 show the JavaScript code for the function. It simply tests that the module, canvas (which is provided by the layer), has been loaded. The layer itself is referenced on line 26. Here it’s incorporated as a CloudFormation parameter, but you could use the ARN directly as shown below.
Layers:
  - arn:aws:lambda:us-west-2:XXXXXXXXXXXX:layer:canvas-nodejs:14
Once the lambda function has been deployed by CloudFormation, you can invoke it to test that the layer is available to the function:
aws lambda invoke --function-name test-lambda-layer out.json
{
    "StatusCode": 200,
    "ExecutedVersion": "$LATEST"
}
cat out.json
"Layer module WAS found"
Note that ExecutedVersion above is the version of the lambda function itself, not the layer—it has nothing to do with the subject of this blog post. To learn about lambda function versions, see the AWS documentation.
Be sure to visit the GitHub repo to experiment with this process.
Delete the Layers
When you’ve finished using the layer in your lambda functions you can clean up your account by deleting the stack that deployed the layers and each of the layers that were deployed into your account.
To delete the stack, use the following AWS CLI command:
aws cloudformation delete-stack                        \
    --stack-name DEPLOY_LAYER_STACK_NAME
This command deletes the stack, but not the layers themselves. If you were to examine TEMPORARY_CFN_FILE.yml you’d see RetentionPolicy: Retain. This keeps the layers installed in your account even though the stack was deleted. To rid the account of the layers, they must be deleted manually.
Versions and ARNs: Part 2
Let’s talk about ARNs and versions again. Every time you use create-cloud-formation-template to retrieve a template file from the serverless repo, and deploy it via cloudformation deploy, you install another destination version of the layer into your account. As mentioned earlier, these destination versions are simple integers, starting at 1 and incrementing by 1 every time you deploy the layer. Even though the version updates, the destination ARN stays the same. If we examine the ARN of the layer we used above, everything before the :14 (or whatever version you’re using) is constant for this layer. Only the last digits after the final : change—these are the sequential destination version numbers. That’s all you need to change to use a different version of the layer.
Layers:
  - arn:aws:lambda:us-west-2:XXXXXXXXXXXX:layer:canvas-nodejs:14
This is true even if you deploy multiple semantic versions from the serverless repo—the ARN is constant and the destination version is incremented. This is true even try if you deploy the same version of the layer by retrieving a duplicate template file. You can examine all the destination versions with this AWS CLI command:
aws lambda list-layer-versions --layer-name canvas-nodejs
The lack of consistency in these serverlessrepo commands is frustrating. As mentioned earlier, the serverless repo can’t be queried symbolically (using the CLI) with a layer name, but one is required here (as opposed to an ARN). The layer name can be retrieved with the aws lambda list-layers command.
The list-layer-versions command might produce something like:
|
|
There are a few things to notice in the output of the list-layer-versions command. First, regardless of the semantic version of the source layer, the destination ARNs (lines 4, 15, 26, and 36) are constant except for the destination version at the end (e.g. :20). Second, duplicate deploys of the same semantic version each get a new destination version number (e.g. 2.11.2 in lines 15 and 36). Finally, notice that source layers with different semantic versions may require different CompatibleRuntimes as in lines 8-11 and 30-32. Be sure to use matching runtimes in the lambda function that uses the layer.
Delete All the Deployed Layers
Now that the stack has been deleted, we just need to delete all the deployed layers. We can use the list-layer-versions command along with a bash for loop for this task:
layers=$(aws lambda list-layer-versions                \
    --layer-name canvas-nodejs                         \
    --query 'LayerVersions[].Version' --output text)
echo $layers
22 21 20 19
for l in $layers; do
> aws lambda delete-layer-version                      \
    --layer-name canvas-nodejs                         \
    --version-number $l
> done
There is one final oddity when it comes to lambda layer versions. AWS retains, for an unknown period of time, the counter for destination layer version numbers. For example, if you have installed layers with version numbers 1-7, and then delete them, the next time you install the same source layer, the destination version numbering will start where it left off—8 in this case. At some point AWS resets this counter back to 1, but I’ve been unable to find documentation on this reset timeframe.
Please visit my related GitHub repo for a simplified demonstration of the deployment (from the serverless repo) and use of lambda layers. Also, I’d really like to hear your feedback. Please add your comments to my tweet that announced this post.
I wrote this post at age 67.